Indulge Guilt-Free: The Ultimate No-Bake Vegan Peanut Butter Cup Pie
Imagine the rich, creamy decadence of your favorite chocolate peanut butter cup, transformed into a luxurious, sliceable pie. Now, imagine doing all of that without ever turning on your oven. Sound like a dream? It’s not! This incredible no bake peanut butter cup pie vegan recipe delivers all the nostalgic flavor and irresistible texture you crave, making it the perfect dessert for any occasion, from casual weeknights to festive holiday gatherings. It’s so easy, the hardest part truly is waiting for it to chill!
This isn't just a dessert; it's a revelation for anyone seeking a delightful treat free from dairy, gluten, soy, and eggs, yet bursting with flavor. Whether you're a seasoned vegan, have dietary restrictions, or simply love a good chocolate peanut butter combination, this pie is designed to impress and satisfy without any fuss.
Why You'll Fall in Love with This Dairy-Free Delight
The allure of a no bake peanut butter cup pie vegan extends far beyond its delicious taste. It’s a versatile and accommodating dessert that truly shines in its simplicity and inclusivity.
- Effortless Preparation: No baking means no preheating, no monitoring, and no risk of a burnt crust. You simply assemble, chill, and serve. This makes it an ideal recipe for beginner bakers or those short on time.
- Dietary Dream Come True: This pie naturally caters to a wide range of dietary needs. It's inherently dairy-free, gluten-free, soy-free, and egg-free, making it a safe and delicious option for many. Say goodbye to the stress of finding an allergy-friendly dessert! For more on its inclusive nature, explore why it's Dairy-Free, Gluten-Free Vegan Peanut Butter Pie: Your Perfect Dessert.
- Unforgettable Flavor Profile: The combination of rich, nutty peanut butter and deep, slightly bitter cacao powder perfectly mimics the classic chocolate peanut butter cup. Each bite offers a harmonious balance of sweet and savory, a true treat for your taste buds.
- Perfect for Any Occasion: Because it requires no oven space, this pie is an absolute lifesaver during holidays when your oven is in high demand. It also travels well (once chilled!), making it an excellent potluck contribution or picnic dessert. Its impressive appearance belies its easy preparation, making you look like a culinary genius with minimal effort.
- Minimal Ingredients, Maximum Impact: You'll be surprised at how few ingredients are needed to create such a show-stopping dessert. This highlights the power of simple, high-quality components coming together in perfect harmony.
The Magic Behind the Melt-in-Your-Mouth Texture and Flavor
The secret to this pie's exquisite texture and rich flavor lies in a few key ingredients and smart techniques. Understanding these will not only help you master this recipe but also empower you to confidently experiment with other no-bake vegan desserts.
The Role of Refined Coconut Oil
Coconut oil is the unsung hero of many no-bake vegan recipes, and this pie is no exception. It's crucial for binding the crust and, most importantly, for firming up the luscious peanut butter filling when chilled. Coconut oil is solid at room temperature and below, providing that essential structure. However, not all coconut oil is created equal when it comes to flavor:
- Unrefined (Virgin) Coconut Oil: This type retains a distinct coconut flavor and aroma. If you love coconut, this can add an interesting nuance to your pie.
- Refined (Expeller-Pressed) Coconut Oil: This is the secret weapon for those who want pure chocolate peanut butter bliss without any tropical notes. Refined coconut oil has a neutral flavor, ensuring your pie tastes exactly like a chocolate peanut butter cup, and nothing else. Always check the label to ensure you're getting the "refined" or "expeller-pressed" variety if you wish to avoid coconut flavor.
The Importance of Ingredient Temperature
One of the most crucial tips for achieving a silky-smooth filling and a well-integrated crust is to ensure all your ingredients, especially the maple syrup, peanut butter, and coconut oil, are at room temperature. If your maple syrup is cold from the fridge, or your peanut butter is stiff, they won't emulsify properly with the melted coconut oil, leading to a lumpy or separated mixture. For best results, measure out your maple syrup and allow it to sit out for at least an hour if stored in the fridge.
Why a Blender is Your Best Friend for the Filling
While whisking might seem like an easy option, using a blender for the peanut butter filling makes an enormous difference. The high-speed blades create an incredibly smooth, airy, and truly silky texture that simply can't be achieved by hand. It helps emulsify the ingredients perfectly, preventing any graininess and ensuring a truly luxurious mouthfeel. This technique is vital if you want to Achieve Silky Smooth No-Bake Vegan Peanut Butter Pie Every Time.
Step-by-Step Guide to Your Chocolate Peanut Butter Dream
Creating this no bake peanut butter cup pie vegan is a straightforward process, broken down into three simple layers. Follow these steps for a perfect result:
1. Crafting the Rich Chocolate Crust
The foundation of this pie is a simple yet decadent chocolate crust that provides a delightful counterpoint to the creamy filling.
- Combine Ingredients: In a medium bowl, stir together almond flour, cacao powder, maple syrup, melted (but not hot) refined coconut oil, and a pinch of salt. Mix until the ingredients are well combined and the mixture starts to stick together, forming a pliable ball.
- Prepare Your Pan: Line an 8-inch baking pan, preferably a springform pan for easy release, with parchment paper. This step is essential for cleanly removing your finished pie.
- Press and Chill: Press the chocolate crust mixture evenly into the bottom of the prepared pan. Use the back of a spoon or your clean hands to create a uniform layer. Place the pan in the freezer to set while you prepare the filling. This prevents the crust from becoming soggy when the filling is added.
2. Preparing the Silky Peanut Butter Filling
This is where the magic happens – a smooth, rich peanut butter filling that melts in your mouth.
- Blend Away: Add the peanut butter (ensure it's smooth, unsweetened peanut butter for best results), room-temperature maple syrup, melted (but not hot) refined coconut oil, a splash of water, and a pinch of salt to a high-speed blender.
- Achieve Perfection: Blend until the mixture is incredibly smooth and creamy. It should be thick but pourable. Scrape down the sides of the blender as needed to ensure everything is incorporated.
- Pour and Freeze: Carefully pour the peanut butter filling over the chilled crust. Gently shake the pan or use a spatula to ensure the top is level. Return the pan to the freezer, ensuring it sits on a flat surface so the pie sets evenly.
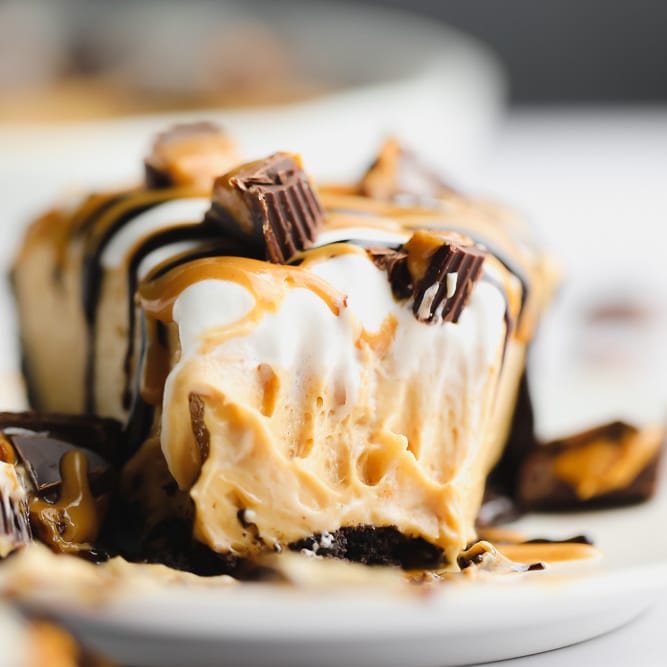
3. The Decadent Chocolate Topping
A final layer of chocolate ganache-like topping adds an extra layer of chocolatey goodness and visual appeal.
- Whisk the Topping: In a small bowl, whisk together cacao powder, room-temperature maple syrup, and melted (but not hot) refined coconut oil until smooth and silky. Again, ensure all ingredients are at room temperature for optimal consistency.
- Application Options: You have a couple of choices here:
- Swirl: For a marbled effect, you can drizzle the chocolate topping over the still-soft peanut butter layer and use a toothpick or knife to create swirls.
- Drizzle: My preferred method is to wait until the peanut butter layer is completely firm, then generously drizzle the chocolate topping over the top. This creates a distinct, glossy layer.
- Garnish (Optional): For extra crunch and visual appeal, sprinkle a few crushed peanuts over the chocolate topping while it's still wet. This also helps hide any "mediocre decorating skills," as some might admit!
- Final Chill: Place the pie back in the freezer for at least another hour, or until completely firm.
Pro Tips for Perfection and Storage
To ensure your no bake peanut butter cup pie vegan turns out perfectly every time, keep these expert tips in mind:
- Quality Ingredients Matter: Use good quality, creamy peanut butter without added sugars or oils for the best flavor and texture. High-quality cacao powder will also make a noticeable difference in the chocolate layers.
- Don't Skimp on Chilling: The chilling time is non-negotiable for this no-bake pie. Allowing each layer to set properly, especially the final chill, ensures a firm, sliceable pie that holds its shape beautifully. Patience is a virtue here!
- Serving Temperature is Key: Because of the coconut oil, this pie will melt if left out at room temperature for too long. Store it in the freezer and transfer it to the refrigerator about 10-15 minutes before you plan to serve. This allows it to soften slightly, making it easier to slice and enhancing its creamy texture.
- Springform Pan Advantage: While an 8-inch regular pie pan will work, a springform pan with a removable bottom makes serving incredibly easy and helps maintain the pie's pristine appearance.
- Creative Variations: While this recipe focuses on simplicity, don't be afraid to experiment. For a richer, deeper chocolate flavor, try adding a tiny pinch of espresso powder to your chocolate topping. Or, if you're looking for an even lighter and airier filling, some variations incorporate silken tofu and coconut whipped cream for an ethereal texture.
- Storage: Leftovers can be stored in an airtight container in the freezer for up to 2-3 weeks. Slice the pie into individual portions before freezing for easy access.
Conclusion
This no bake peanut butter cup pie vegan is more than just a dessert; it's a testament to how simple ingredients, thoughtfully combined, can create something truly extraordinary. Its ease of preparation, combined with its irresistible chocolate peanut butter flavor and dietary friendliness, makes it a perfect choice for anyone looking to enjoy a sweet treat without compromise. So go ahead, whip up this magnificent pie, and prepare to delight your senses and impress your friends and family. The only challenge you'll face is making sure there's enough for everyone!
